

Are you an international student planning to travel to Canada for your higher education and have no clue about the documents required at Canadian airports?
Don’t worry!
I was once at your place: totally stressed about my first-ever, solo, international travel and thinking:
“What if I don’t have all the documents immigration officers need?”
“What if Indian immigration authorities do not let me go?”
“What if I forget my documents and am barred from taking the flight? Lol!”
This is normal, so calm down.
The experience will not at all be scary as long as you are prepared and have all the documents you need for verification of your identity, travel, and immigration.
In this comprehensive guide, I will not only be covering all of the essential documents you need to have a smooth, stress-free journey from your home country to Canada, but I’ll also be sharing all the optional documents that will help you later in your studies and work in Canada.
Lastly, I’ll be sharing some really important things you need to remember while preparing your documents for travel.
Without further ado, here is the complete list of documents you need once you land in Canada:
Stamped Passport
Your Passport is unarguably the most important travel document that you need, it is not just used by the airline and the immigration officers at your home country’s airport, but also used by the immigration officers for the verification of your identity and VISA stamp before granting you the Study Permit. Keep it with you at all times during the whole travel process.
Letter of Introduction
The Letter of Introduction or Final Correspondence Letter is the final document you get from IRCC after the approval of your student VISA Application and the completion of the VISA stamping on your passport.
Remember, it is not your study permit. Instead, it gives you the right to enter Canada to receive your study permit from an immigration officer, who will do a final check of your application. It is one of the most, if not the most important document, you need to carry with you when traveling to Canada because IRCC themselves say in the letter that:
Bring this letter of introduction with you to Canada. It has information that may be used by the Canada Border Services Agency to issue your study permit.
Letter of Acceptance (LOA)
The Letter of Acceptance (LOA) is your university’s or college’s offer letter that tells the immigration officers that you have been granted admission by the institution and will be an incoming student at that institution.
Enrolment Letter
The College or University’s enrollment letter is used to verify the status of a person as an enrolled student at that institution. It includes the following details about the student:
- Name
- Student ID
- Part-time or Full-time Status
- Current Semester and Year
- Program of Study
- Start and End Date of the Program
The enrolment letter is used to verify all the details mentioned above and includes the signature of the office of the registrar. If you haven’t begun your studies, you most likely won’t have it and the letter of acceptance will be sufficient to prove that you are a student at that institution.
But if you’ve started attending the classes before traveling as was the case with me, you can go to your college or university’s website to find out how you can request the letter. As a student at Sheridan College, I downloaded my enrolment letter from the Student Portal (Student Center).
GIC Welcome Letter & GIC Investment Confirmation
Under the heading called ‘the documents you must bring to get your study permit’ in the Letter of Introduction, IRCC mentions that you should have ‘proof that you have enough money to support yourself during your study in Canada.’
The documents you need to prove that you have enough money to support yourself will differ for different students. If you’re a student who has filed the VISA application under the SDS Category, you’ll be required to carry the GIC Welcome Letter which you get after opening your GIC account and depositing CA$10,200 in a Canadian Bank offering the GIC Program such as Scotiabank, CIBC Bank, etc. The GIC Welcome Letter contains instructions on how you can get your bank account activated after landing in Canada and confirms that you have enough money to help pay for living expenses while you’re studying in Canada: it’s good proof of funds for the officers.
Similarly, the GIC Investment Confirmation is another document that confirms that you have deposited CA$ 10,000 at a Canadian bank to meet your living expenses in Canada. This is the document you get just after depositing your money in the Bank. As an SDS VISA category student, print and carry both these documents with you.
For the NON-SDS VISA category, GIC investment is not mandatory and other financial documents are required in order to show financial stability such as bank statements, investments, savings accounts, real estate documents, etc. Basically, as per the VISA category, you need to carry the same documents you submitted as proof of funds when filing your student VISA application. Make sure the documents are up-to-date and show a strong financial situation.
Some NON-SDS VISA applicants also get GIC Accounts opened to have a strong ‘proof of funds’ even though GIC isn’t a requirement in the NON-SDS VISA Category.
Tuition Fees Payment Receipt
If you’re a student who applied for a student VISA in the SDS category, you would’ve likely paid your complete one-year’s tuition fee for College or university as per the requirements of the SDS VISA category. After the institution had received the payment, they would’ve provided you with a payment receipt. You need to carry it with you as it proves that you’ve paid your first-year tuition fees to the college or university. If your institution didn’t send you the receipt or doesn’t provide the receipt to students, call or email them and request it.
The students who submit a VISA application under the NON-SDS category are required to pay six months of tuition fees to their Designated Learning Institute (DLI). In this case, you’ll need to carry the receipt for payment of tuition fees for 6 months, plus any additional documents that show strong financial status like fixed deposits, tax returns, etc.
IELTS TRF
You would’ve definitely taken an English Proficiency Exam like the IELTS or TOEFL before filing your Canadian student VISA. The IELTS TRF or Test Report Form is the paper copy of your IELTS test results showing your overall band score and individual band scores in each of the four IELTS sections (Listening, Reading, Writing, and Speaking).
Even though the IELTS eTRF (electronic Test Report Form) which is in the form of a pdf is submitted when filing the student VISA application, you are required to print it out and carry a copy of the test results with you while traveling to Canada as it is used for verifying your English language proficiency. It’s not the most important document, but the immigration officer might ask you for it, so it is better to be safe than sorry.
eMedical Information Sheet
Every student applying for a student permit regardless of the VISA category (SDS or NON-SDS category) has to complete the medical examination from a panel physician approved by IRCC. Most doctors use the online tool named eMedical to record and send Immigration Medical Exam (IME) results to IRCC.
After you complete your medical exam from any authorized doctor approved by IRCC, you will receive an eMedical Acknowledgement or Information Sheet which, as written in it, “outlines the status of the immigration health examinations that you have undertaken at an eMedical clinic.” This is submitted with your VISA file as proof of completion of the upfront medical examination and you need to carry the same with you to Canada.
Now, if your panel physician didn’t use eMedical, you’d need to submit the Upfront Medical Report form [IMM 1017B] in your VISA application and carry the same when traveling.
Education Transcript or Marksheet
The education transcript or mark sheet you need to carry to Canada is the one that you submitted in your VISA application. It should be your most recent secondary or post-secondary educational transcript. If you’re an incoming diploma or bachelor’s degree student, you’ll need to carry your senior year of high school or Grade 12th Marksheet. If you’re an incoming Master’s student, you’ll need to carry your degree’s final year transcript. Basically, whichever transcript you submitted when filing your VISA application.
Personally, I did the IB Diploma Programme in my junior and senior years of high school, so I carried my final IB transcript and Diploma with me to Canada.
Travel Documents
Travel Documents include all documents that you need to smoothly travel from your home country to Canada. These include some mandatory documents like your Flight Ticket and Passport but also include some optional documents like a Travel Insurance policy, ArriveCan Advance CBSA Declaration, Currency Conversion Bill, Address/ Contact Labels on Luggage Bags, etc.
As for the Flight Ticket, you’ll need it while entering the International Airport in your home country. The security guards will check your flight ticket before letting you go inside the airport. You can also show the flight e-ticket on your smartphone, but it’s better to have a paper copy to be on the safer side.
Now, having Insurance for your flight journey is not mandatory but it’s a really good idea to insure your travel by purchasing an insurance policy as everything is so uncertain in today’s times.
The Currency Conversion Bill is the receipt you get when you convert your cash from your home country’s currency to Canadian dollars before you move to Canada. Most international students carry some cash in order to meet initial expenses before their GIC account gets opened in Canada. It’s important to carry the bill. In case the immigration officer asks you about the amount of money and from where you got it, you’d have a say with the proof.
The ArriveCan Advance CBSA Declaration is an optional travel feature in which travelers can fill their customs and immigration information in the ArriveCan app, 72 hours before landing in Canada. This saves time in the declaration section at the airport as the information you filled in the app is retrieved by the machine and you just need to print it out at the airport instead of answering all the questions at the Airport itself. Note, this is only available at certain Canadian Airports.
I filled out the ArriveCan Advance CBSA Declaration and got done with the declaration section before other international students and it saved a lot of time at the immigration as I was way ahead in the queue.
Not to mention, you can also stick paper slips containing your address and contact information on your luggage bags, so in case your bags are misplaced at the airport, it would be easier for anybody to call and contact you about them.
Lastly, I suggest every international student carry multiple copies of their passport’s front and back pages with them as the passport is the most important travel document you need. It’s safer to carry these copies in case there is an emergency situation.
By the way, guys, if you wanna watch me travel from India to Canada and explain to you the whole process of the journey visually, do watch this video 👇
Trust me, you shouldn’t miss this one.
As of 2023, these are the must-have documents before planning to travel to Canada. It doesn’t include ArriveCan, Quarantine Plan, and Vaccination Certificates as the Government of Canada lifted those requirements and made them optional for travelers entering Canada. The requirements for travelers entering Canada keep changing as the pandemic situation changes in the world.
Therefore, I would highly recommend you check the IRCC website for the latest travel information and requirements and also keep in touch with your DLI (Designated Learning Institute) for more information about international student travel requirements as most DLIs have their own travel requirements like travel support letters, etc.
With that said, there are, however, some optional documents that I personally carried and suggest everybody carry even though they are not a requirement for traveling to Canada.
Academic Documents
In addition to carrying your most recent education transcript as part of the VISA process requirement, I suggest you carry all the transcripts and mark sheets from your past education including high school and undergrad (if applicable).
Personally, I carried my mark sheets for all semesters from Grade 9th to Grade 12th. I also carried my 10th Grade international examination transcript for IGCSE exams and my 12th Grade IB Diploma apart from the mandatory Grade 12th transcript.
Institution-Specific Documents
Some DLIs also have their own mandatory requirements before allowing international students to travel to Canada. Make sure you know your institution-specific requirements before traveling. For instance, some institutions require filling out travel support letters or travel confirmation letters before allowing international students to travel.
When I was making my travel plans, Sheridan College required me to fill out a college-specific travel and quarantine plan form even though all the covid-restrictions had ended at all Canadian Airports. Hence, it’s important to read the travel information for International Students on your college’s website.
As I traveled after my college’s mid-term exams, I took a screenshot of my College’s weekly class schedule and timetable in case I had to prove that I am in fact attending the classes. You can also do the same if you’ve been attending classes.
Moreover, I carried other Institution specific documents, like College Entrance Scholarship Letter, Passport-size Photograph for my Student ID Card, and Health Insurance Card, etc.
VISA Application Documents
I also recommend you carry all the documents you submitted to IRCC when filing your student VISA Application, including all the VISA Forms, Client Information (which includes Statement of Purpose), Passport size photographs, Certificates, and any other documents.
For students that have co-op work terms as part of their programs and are applying in the SW-1 VISA category, make sure you also carry the Co-op Work Permit Letter for the program at your institution. The co-op work permit letter is a general letter (not specific to a student) that shows that a specific program includes co-op work terms as part of the program. It is used by IRCC to verify co-op in your program and grant you the co-op work permit.
On a side note, if you wanna know what documents you submitted for your VISA Application or the documents you need to apply for a Student VISA from your country, you can check out IRCC’s Application to Study in Canada Page.
IRCC Documents
After the submission of your VISA Application and throughout the timeline of the VISA application process, you’ll receive various documents from IRCC from confirmation of your application submission to biometrics instructions to the Original Passport Request.
I highly recommend you carry every single one of these documents in addition to the must-have documents I mentioned above as you never know what the immigration officer might ask you to pull out.
Personally, in addition to all of this, I took a screenshot of my GCKey’s timeline (which shows all the documents and the dates I received them) and got a print of that. So in case the immigration officer questioned my VISA approval, I would’ve had the whole VISA timeline screenshot to show.
Covid-Related Documents
As of 2023, all Covid Restrictions for international travelers have been lifted. Some of the requirements have become optional but most of the restrictions like covid tests, masks, quarantine plans, etc have ended for all air travel to and from Canada.
Personally, I traveled in a situation when all the requirements had recently ended. Hence, in order to be on the safer side, I prepared my covid-related documents as well. Reflecting back, it was unnecessary but at that time I was not leaving a single thing to chance.
But we never know what the future holds for us, so I will list all the covid-related documents that are required for air travelers during the times of covid restrictions in the document checklist below. In case, restrictions are placed again in the future, you’ll have a reference to these documents as well.
Home Country’s Documents
Even though you are moving to another country, it doesn’t mean you will never require your home country’s government IDs afterward. It’s safer and better to carry copies of at least one if not all of your government IDs to Canada. You’ll at least have your home country’s government-issued ID until you get a valid government-issued ID in Canada.
Do remember to leave copies of your government IDs in your home country, so if your family needs them for some reason, they’d have copies of your government IDs at their disposal.
Personally, as an Indian, I carried my Aadhar Card, Pan Card, and Birth Certificate with me when I traveled to Canada.
Career-Related Documents
This category of documents is entirely optional but I consider them mandatory if you wanna have an easy transition into the Canadian environment.
The first thing that will help you as an international student is preparing and carrying multiple copies of your resume. Almost all part-time jobs even the general ones require students to submit their resumes. Therefore, it’s a good idea to prepare your resume in advance and carry multiple copies of it to Canada. So you can start your part-time job search process as soon as you come to Canada.
Secondly, carry your Driving License, Driving Experience Letter (DL Extract) and if possible an International Driving License. When you come to Canada, you’ll most likely use public transportation to commute to and from College and Work. But having a driving license and driving experience letter will help you in fast-tracking your actual driving timeline by 1 year in Ontario, for example. So if your aim is to drive a car in Canada as soon as possible, you should definitely bring this stuff. Otherwise, you’ll have to wait for at least one year after your G1 knowledge test in Ontario to attempt your G2 Roadtest Test (which allows you to drive a vehicle).
Documents Checklist
Here is the checklist of all the documents mentioned above, feel free to print it and check-mark the documents as you wish:
Must-Have Documents
Official Academic Transcripts/ Marksheets from Past Education
Institution-specific Documents
VISA Application Documents
IRCC Documents
Covid-Related Documents
Note: If you’re an Indian, convert the national vaccine certificate to international using the CoWin website. Just log in and enter your passport number, and you’re done.
Travel Documents
Home Country’s Documents
Career-Related Documents
Travel Tips
Here is a short piece of advice from my own travel experience. I hope you won’t make the common mistakes most students make.
Carry all the Documents you used in the process ✅
If I were to summarize this post in one line, this would be it. Whatever documents were used in your VISA application are the documents you need to carry to Canada. This is a general rule but easy to forget.
Have Multiple Copies ✅
I recommend all international students have multiple copies of every must-have document mentioned above, including but not limited to, Stamped passport, Letter of Acceptance, Enrollment Letter, IELTS TRF, GIC Welcome Letter, etc.
Personally, I got two additional colored printouts for all the important documents and two black-and-white printouts for every single document in the folder (including essential and optional documents). This made my handbag really heavy and as I realized later, it was quite unnecessary.
Hence, I’d recommend you get only one extra copy for each document, and if you want, get two copies for just the important documents.
Organize Your Documents ✅
Imagine going to the immigration officer and searching frantically through tens and hundreds of papers in your folder for your Letter of Introduction. It won’t be the best first impression to the officer. You can easily avoid this by organizing your documents and labeling each one of them.
I bought a folder with laminated pockets and placed the most important documents in the beginning. Moreover, I created labels by writing the document names on paper slips and placing them at the top of each document, so I know what the document is. Hence, it’s a good idea to not just organize but label your documents, so it’s easier to find the document when you need it.
Have All Documents on your Phone ✅
- The first step to organizing your documents is to organize the document files on your computer before you print them. Here’s how I did it: I created a folder named “Canada Documents” on my computer and organized all the documents into the following categories: VISA File Documents, Travel Documents, Sheridan College Documents, Others, Passport, Academic Documents, and GC Key Documents. I placed every single document in one of these folders and kept a copy of the files of the five most important documents outside the folders. Here is the image of that: I used this folder for printouts and copied the complete folder on my phone, so in case I am not able to find the hard copy or if anything else happens, I have the document on my phone to show to the Immigration officer. Remember, having documents on your phone doesn’t substitute a paper copy, it’s just another safety measure. PRO Tip: While organizing your files, rename each document meaningfully, so when you use the file search option on your phone, it automatically brings up the file you’re looking for without having to open the folder yourself.
The first step to organizing your documents is to organize the document files on your computer before you print them. Here’s how I did it:
I created a folder named “Canada Documents” on my computer and organized all the documents into the following categories:
VISA File Documents, Travel Documents, Sheridan College Documents, Others, Passport, Academic Documents, and GC Key Documents.
I placed every single document in one of these folders and kept a copy of the files of the five most important documents outside the folders. Here is the image of that:
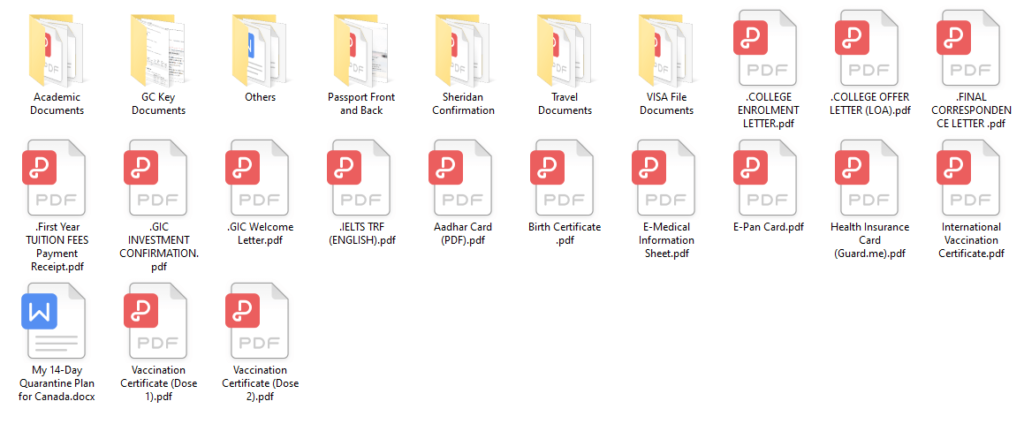
I used this folder for printouts and copied the complete folder on my phone, so in case I am not able to find the hard copy or if anything else happens, I have the document on my phone to show to the Immigration officer. Remember, having documents on your phone doesn’t substitute a paper copy, it’s just another safety measure.
PRO Tip: While organizing your files, rename each document meaningfully, so when you use the file search option on your phone, it automatically brings up the file you’re looking for without having to open the folder yourself.
Keep Documents in Your Handbag ✅
Pro Tip: Carry your passport carefully and do not keep it at any place in the Airport. If you do, remember to pick it up. I remember one passenger forget his passport at the security check area and wasn’t allowed to board his flight until he retrieved it. To avoid this, I purchased a fanny pack (which is allowed on Air India’s flights) to carry my passport safely as I didn’t want to keep holding it in my hand.
Keep The Documents in Your Handbag: Almost every international airline offers its passengers the option of carrying multiple bags. If you’ve never taken a flight before, as is the case with most students, you would most likely be unaware of the fact that the luggage bags are handed over to the airline at the check-in counters before boarding the flight and the only bags you carry with you inside the flight cabin are your cabin bag and handbag. Not just that, you only receive your luggage bags after you complete the declaration and immigration process at the Canadian Airport.
Now, if you keep your important documents in your luggage bags, what would you show to the immigration officer after landing in Canada?
You won’t be allowed to go to the baggage area before completing immigration. Hence, it’s really important to not just keep all of your documents in your folder but keep them with you in your carry-on bags, ideally your handbag.
Personally, I traveled from India to Canada via Air India’s AI 187 Flight and I had the option of carrying 2 luggage bags and 2 carry-on bags. I kept the folder containing all the documents in my handbag.
If this post helped you a little bit, let me know by typing, “It was really helpful” in the comments below.
It takes a lot of time to write this content for you guys as I am a student myself 😅 but my aim is to help international students to pursue their education dreams, so I’d be thankful if you can share this post with a person who needs it, so it helps them out
Do let me know a topic you want me to write about next.
And I’ll see you in the next one.
Take Care & Bye Bye.


Hi Zohair, I hope you are doing great. First of all I want to say your videos are helping me a lot to save the research time and thankyou for that. I have a query that my English is not that good, the moment I saw your essay video I was flattered tbh, but your amazing essay’s got rejected, and I am afraid that due to my English will my essay’s be rejected? Please reply , my English is normal , very basic and some time even I make mistakes so please tell what to do and how to . it would be great if you reply as soon as possible, hoping for your reply , thankyou
Also if you have an email please address it in your YouTube, it would be easy for people to reach you out
I don’t think you need to have perfect English in order to get scholarships at top universities.
Every profile is unique, and a combination of factors are responsible for acceptance or rejection.
Don’t overthink about your English, I used to do that too, as long as you can get the message across, you’ll be good.
Let me know if you have any other questions.
All the best
Email: zohairansari101@gmail.com
Also, I wanted to ask you about LOR’s, as I have to apply for more than 10 universities, so do I need separate LOR for every university? it’s quite inconvenient, please reply, the whole process of LOR, I have to apply this year, it would be amazing if you helped me, also check your insta for queries.
It would be good if your teacher can personalize the LOR for each university, but you don’t necessary have to do that.